Deploying Java Apps on Heroku
Now that you understand the basics of how Heroku works, let’s actually deploy an application.
Goalsetting
In this section we will:
- clone a project from GitHub
- provision an application on Heroku
- push the application to Heroku
- see it running live in the browser
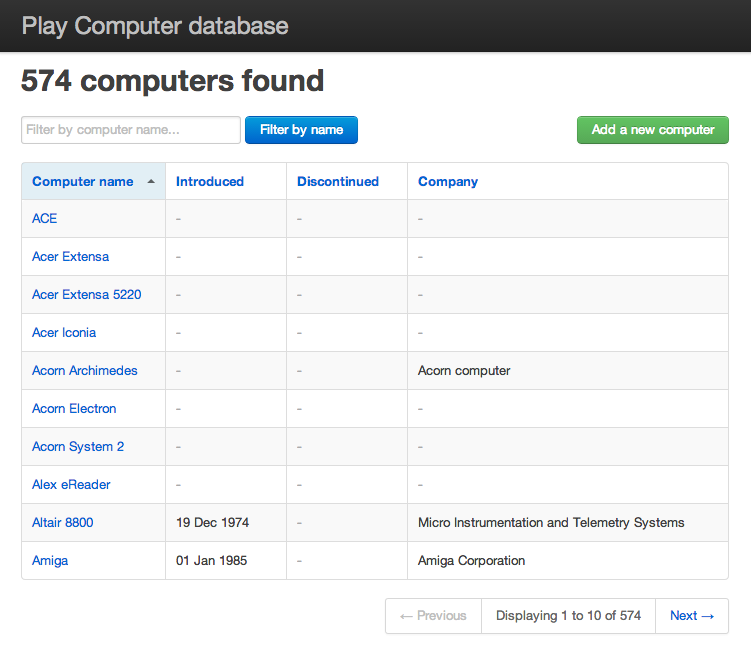
What You’ll See
When we’re finished, we’ll see the running application like this:
Using the Toolbelt
Let’s talk a bit more about the Toolbelt.
Setup
The prerequisites here are a Heroku Account and to install the Toolbelt.
Does It Belong to a Project?
The Heroku toolbelt is an executable that gets installed and added to your path. That means that you can run it within your terminal, regardless of which folder you’re in.
Most of the time you’ll run it from inside a project’s root folder.
What Can It Do?
Anything you can do to an application through the Heroku website, you can do with the toolbelt. You can also do several things that are difficult, impossible, or just slow through the website. The most common include:
- Creating applications
- Adding and removing backups
- Managing add-ons
- Running one-off commands on the server
- Manipulating environment variables
- Checking the runtime logs
The best way to learn about it is to use it. Here goes!
Creating an Application
Setup
We’re assuming you’ve got the sample project cloned already. If not, do so like this:
Terminal
$ $ | |
As it stands, the application can be run locally, but it’s not ready for Heroku! Let’s intentionally run into some problems, then look at the resolutions.
heroku create
As in the instructions above, you’ve used cd to change into the project directory. Now let’s provision an instance on Heroku:
Terminal
$ | |
"Calm Ocean"! That’s the kind of serenity I’m looking for in my web development. If you don’t specify a name, Heroku generates a random name for the application that’s two words followed by a four digit number.
Heroku Git Remote
When you run heroku create…
- A repo is provisioned on Heroku’s side
- The git URL for that repo is added as a master named
heroku - The toolbelt can later find the app by looking for that remote in the git config
heroku rename
But maybe you want your application to sound more official. You can use heroku rename:
Terminal
$ | |
Now we’re ready for the enterprise. You could also have specified the name with the initial create command, like heroku create deploying-java-002.
Got an error? Applications need to have a unique name for across the platform. So if you followed the example exactly your name collided with an instance we previously created. Come up with your own name!
heroku open
You have a running instance…kind of. Run this:
Terminal
$
| |
Your browser will pop up, attempt to load the application, and give you an ** Application Error**. You haven’t actually deployed the code yet!
Deploying the Application
Let’s get our code running on Heroku.
git push
We explained before that you transmit code to Heroku through git. To deploy the application, do the following:
Terminal
$
| |
Try Again
Once the code is up we can try the site again in the browser. Just refresh with the same address. You’ll still see an Application Error
The Procfile
The Procfile is a file that tells Heroku exactly how to run your application. The execution process will be very different for a Java application versus Python, Ruby, or JavaScript.
The Procfile defines one or more processes for your application. Typically applications define a web process for the primary web application, and might create something like worker for background workers. Each named process defines a single executable to run.
Let’s look at setting up a web process for our Play application.
The Process for Play
When we ran the Play application locally we did it with:
Terminal
$
| |
In production it’ll be a bit more complicated.
target/start
On Heroku’s Dev Center they recommend:
1
| |
What? Let’s unpack that piece by piece:
- The process will be named
web - The executable to run is
target/start - We want it to run on the port specified by the environment variable
PORT, which is automatically set by Heroku - We’ll pass in any options for the JVM stored in
JAVA_OPTS - We want to automatically apply any "evolutions", the technique Play apps use for changing the structure/contents of the database
- The database driver should default to PostgreSQL
- The URL for the Postgres database is specified in environment variable
DATABASE_URL
Make It!
- Use your text editor to create a file named
Procfilein the root directory of the project. Note that it starts with a capital P. - In that file, add just a single line: the
web:line above. - Save the file
- Commit it to git
You can do those same steps with a bit of UNIX-fu like this:
Terminal
$ | |
Push it to Heroku again (git push heroku master) and refresh it in your browser.
Looking at Logs
Still getting an Application Error? Try this…
Terminal
$
| |
You’ll see a lot of output from the log file including some lines like this:
1 2 3 4 5 6 | |
Specifically:
1
| |
The app is crashing because it can’t load the PostgreSQL driver.
Dependencies
When you deploy an application to Heroku the platform has to build the slug. Typically web applications rely on external libraries for some of their functionality. For the slug to be ready-to-run, it needs those dependencies downloaded and zipped in.
Expressing Dependencies
How you express dependencies will vary by application. In a Ruby app, it’s through the Gemfile. In a Play app, that happens in project/Build.scala.
project/Build.scala
Open that file and you’ll see:
1 2 3 4 5 6 7 8 9 10 11 12 13 14 15 16 17 18 | |
Note the middle section about appDependencies.
Adding PostgreSQL
In this section we need to express a dependency on the Java library for PostgreSQL like so:
1 2 3 4 | |
Note the comma that was added to the end of the hibernate line, too.
Commit and Re-Deploy
With that dependency in place we can retry deployment:
Terminal
$ $ $ | |
If you watch closely during the deployment you’ll see:
1 2 3 | |
Now the Postgres driver is available.
Try It
Refresh your browser and…you should see a working web application!
Recap
- We started with a working play application
- We provisioned the application with
heroku create - We renamed it with
heroku rename - We pushed up code with
git push heroku master - We created a
Procfiletelling Heroku how to execute the application - We used
git push heroku masterto update the application in place - We used
heroku logsto learn more about our application error - We expressed a dependency on the PostgreSQL library
- We updated the app and it worked!
References
- Deploying to Heroku, Play Framework Documentation
- Heroku Play Framework Support, Heroku Dev Center
